Monday, August 6, 2012

Split complex images in Photoshop 1 simple way

You can find a lot of tutorials about splitting a complex out of the background on the forum about Photoshop. This article guides you to a simpler way to achieve the desired effect in just a few steps.

Initially, you should find some images appropriate to the practice. You can use Google Images to find a picture or can comfortably use the image in her writing. You open the image up in Photoshop and start work.

To Filter > Extract and use the settings as below.
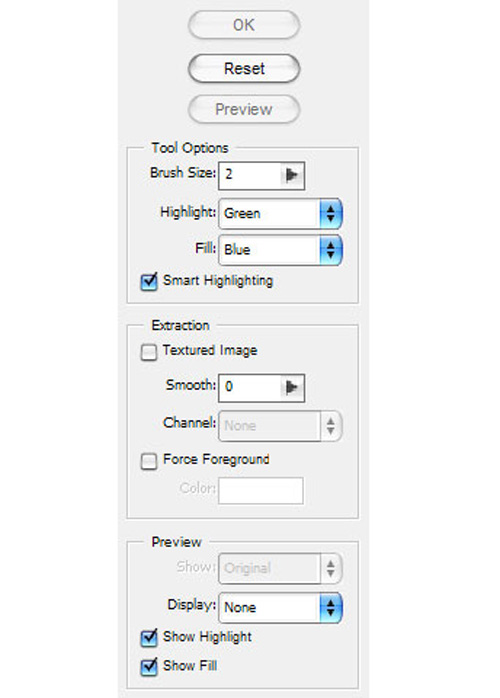
Tách hình ảnh phức tạp 1 cách đơn giản trong Photoshop, Công nghệ thông tin, Tach anh trong Photoshop, Photoshop, su dung Photoshop, kinh nghiem tach anh trong Photoshop, vi tinh, thao tac co ban trong Photoshop

Begin separating the images, Please enlarge the photo with Zoom Tool so that you can clearly see the border and set up the appropriate size of the brush. Then, you use the Edge Highlighter Tool to cover objects. If you include the wrong rims, use the Eraser Tool to edit again. Next take a self-contained pattern you want to cut by selecting the Fill Tool in the toolbar on the left and click inside the object needed to cut.
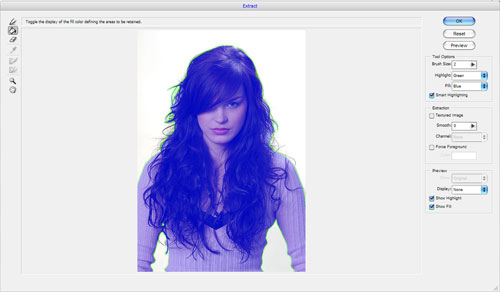
Tách hình ảnh phức tạp 1 cách đơn giản trong Photoshop, Công nghệ thông tin, Tach anh trong Photoshop, Photoshop, su dung Photoshop, kinh nghiem tach anh trong Photoshop, vi tinh, thao tac co ban trong Photoshop

Now you click the OK button in the upper right of the window, you will return to the usual Photoshop window. If you perform the steps in the instructions above, you will have an image with no background.

Tách hình ảnh phức tạp 1 cách đơn giản trong Photoshop, Công nghệ thông tin, Tach anh trong Photoshop, Photoshop, su dung Photoshop, kinh nghiem tach anh trong Photoshop, vi tinh, thao tac co ban trong Photoshop

Then create a new layer below the layer object and colored with the code # aed2da.

Tách hình ảnh phức tạp 1 cách đơn giản trong Photoshop, Công nghệ thông tin, Tach anh trong Photoshop, Photoshop, su dung Photoshop, kinh nghiem tach anh trong Photoshop, vi tinh, thao tac co ban trong Photoshop

Now, you may find that some parts of the photo looks rough. To fix this use Eraser Tool and select the settings like underneath.
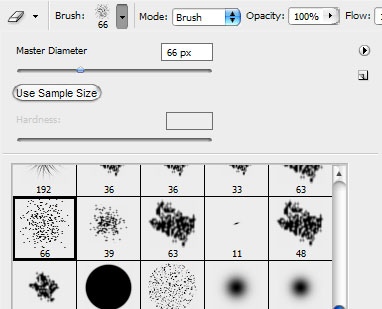
Tách hình ảnh phức tạp 1 cách đơn giản trong Photoshop, Công nghệ thông tin, Tach anh trong Photoshop, Photoshop, su dung Photoshop, kinh nghiem tach anh trong Photoshop, vi tinh, thao tac co ban trong Photoshop

Reduce the size of the brush down 25 pixels and revised the sections were rough.

Tách hình ảnh phức tạp 1 cách đơn giản trong Photoshop, Công nghệ thông tin, Tach anh trong Photoshop, Photoshop, su dung Photoshop, kinh nghiem tach anh trong Photoshop, vi tinh, thao tac co ban trong Photoshop

The next step, after handling the issues of images by Eraser Tool, you can see the image looks is not clear. To eliminate this problem please select tool Smudge Tool with the settings as follows: Brush 2 px, Mode: Darken, Strength: 95%.

Tách hình ảnh phức tạp 1 cách đơn giản trong Photoshop, Công nghệ thông tin, Tach anh trong Photoshop, Photoshop, su dung Photoshop, kinh nghiem tach anh trong Photoshop, vi tinh, thao tac co ban trong Photoshop

Increases the sharpness of the picture with the Sharpen Tool and set the following Brush: 60 px, Mode: Normal, Stregth: 30%.

Tách hình ảnh phức tạp 1 cách đơn giản trong Photoshop, Công nghệ thông tin, Tach anh trong Photoshop, Photoshop, su dung Photoshop, kinh nghiem tach anh trong Photoshop, vi tinh, thao tac co ban trong Photoshop

Completion of the above steps is that you've got a photo with model đc split details to each strand of hair.

Tách hình ảnh phức tạp 1 cách đơn giản trong Photoshop, Công nghệ thông tin, Tach anh trong Photoshop, Photoshop, su dung Photoshop, kinh nghiem tach anh trong Photoshop, vi tinh, thao tac co ban trong Photoshop

According To Tung Pham (MO)

No comments:

Post a Comment